by Tim Bryce
M. Bryce & Associates (MBA)
Palm Harbor, FL, USA
TABLE OF CONTENTS
INTRODUCTION
Many people ask, "Should we build a web page?" The answer is an
unequivocal, YES! Web pages can greatly assist a company
or non-profit organization in terms of communicating with:
- Its customers, both current and potential.
- The surrounding community (it is a handy public relations tool).
- The media, for research and promotional purposes.
- Its own personnel or membership.
The following tutorial on Web Page Design is excerpted from
MBA's
(M. Bryce & Associates; Palm Harbor, FL) corporate web page on
"Internet Services":
Unlike printed media, the Internet offers no practical limitations in terms
of what can be presented. Consequently, the user's first inclination is to
try and put too much into their web page (we call this the "War & Peace"
phenomenon). Before embarking on a web page design, it is important to
establish a roadmap in the form of a simple Table of Contents. This will
ultimately dictate the scope of the project and provide the structure for
web design.
The next common pitfall by new users is to try and develop a web page
that is overly sophisticated. True, things like music and animation are
impressive eye-catchers, but often there is a price to pay for their use. For
example, since a web page is essentially a collection of files that must
pass over communications lines, the speed by which a web page is displayed
is based on how fast these files can be transmitted over the lines. If the
files are large, then it will take time (and a person's patience) to display
the web page. Although text files travel rapidly over communications lines,
certain graphics files (as well as animation and audio files) do not. In
other words, the most sophisticated web page may prove to be ineffective
if the user has to wait an inordinate amount of time in order for it to
load in a web browser. Bottom-line: the web designer must ultimately
ask, "Is it worth it?" MBA recommends keeping your first web
page simple and to the point (the KISS principle). By following basic
design guidelines, you can build an effective web page quickly.
DO'S AND DON'TS
The following is a basic set of guidelines to be observed during
web page planning and design:
- Devise a standard web layout for consistency and ease of use. This
includes selecting suitable fonts and sizes that are easy to read; a
color scheme (consider corporate colors as well as contrast between
background and foreground colors); use of corporate logos and trademarks;
and basic positioning layout (e.g., a "frames" based web page versus a
single standard page). Inconsistent design layouts tend to confuse the
reader and present a disjointed picture of your company.
- Follow standard design layouts that are commonly used on the web. It
is not always a good idea to pioneer a radically new web layout. Your
intention should be to simplify how your web page should be read. A
radical new approach to web design may be visually appealing and
"state-of-the-art" but is it "user friendly?"
- Building a web page is similar in nature to designing a form; keep
it clean and organized, not cluttered and unstructured. Your objective
is to make it readable and usable.
- Know your intended audience and speak in their language, avoid technical
jargon if possible (unless you take the time to define it). Make it legible
and intelligible. Also remember that 73% of all web surfers have a high
school degree or higher. The fact they are reading your web page means they
are somewhat computer proficient and intelligent.
- Always do what is practical and works, not what is overly glamourous
or sophisticated. BUILD WEB PAGES THAT WORK!
Like a newsletter or sales brochure, you want to make your web page an important
communications and public relations tool for you. It is important that you create a
dynamic web page that is kept up-to-date. A dull and static web page
(one that is rarely updated) may be visited only once and never again. A dynamic
web page will draw your customers, members, friends, and guests back for more
information time and again.
So, what should your web page include? First, you must consider the person who
is going to maintain it and their capabilities. You must be careful not to tax
their time or talent. Keep it simple at first, then evolve it over time. For Masons,
I suggest your read my paper on
Publicity & Public Relations for the type of things you should include in
a Lodge's web page.
|
|
HTML BASICS
The purpose of the remainder of this paper is to provide an explanation on how to
write HTML "Hyper Text Markup Language," a tag language used to develop web
pages. As such, consider this your personal reference guide for writing HTML. It
is intended as a primer on HTML for novices and a reference for experts, but
does not represent an all-encompassing source of information on HTML (see the
Reference section for additional sources of information).
An HTML file (.HTM or .HTML) is essentially nothing more than a text file with
special tags to manipulate the graphics and text shown in a web browser. There
are two ways of developing an HTML file: using a common text editor (the
preferred choice of the author), or to use a web authoring tool; for example,
most of today's word processors provide the means to convert a document into
HTML; there are also programs specifically designed to visially create a
document and convert it to HTML.
This paper will focus on the HTML tags themselves and not on web authoring
tools. You can either print this web page accordingly, or view and print the
HTML code used to produce it. To view the code, use Netscape's "Page Source"
(under "View") or Internet Explorer's "Source" (under "View"). The HTML tags
provide workable solutions for you to modify and use.
Simply put, HTML tags consist of a left angle bracket (<), (a "less than"
symbol to mathematicians), followed by name of the tag and closed by a right
angular bracket (>). Tags are usually paired, e.g. <h1> and
</h1>. The ending tag looks just like the starting tag except a slash
(/) precedes the text within the brackets. In the example, <h1> tells
the Web browser to start formatting a level-one heading; </h1> tells the
browser that the heading is complete. The primary exception to the pairing
rule is the <p> tag. There is no such ending tag as </p>.
HTML is normally not case sensitive, it will accept both upper and
lower case tag entries. However, some obscure web browsers still have
problems reading upper case letters (particularly in the UNIX world)
so we tend to use lower case throughout this tutorial. You may also
wish to use lower case tag entries yourself.
|
|
SETUP
First things first; an HTML file must begin with the HTML tag itself:
<html>
And the last tag of the file must be:
</html>
The HEADing tag normally follows the HTML tag and is used to specify the heading
of the web page: <head> </head>
The TITLE tag is associated with the HEAD tag and expresses the name of the
web page (at the very top of the web browser); for example:
<head><title>Palm Harbor Main Street</title></head>
BODY tags normally follow the HTML and HEAD tags, and are expressed as: <body> </body>
(normally going just before the </html>
tag). The <body> tag is used to specify the
default colors and fonts used in the body of the web page, along with background color or
image. A typical example of a BODY tag is:
<body bgcolor="#0000AA" text="#FFFF00" link="EEE000" vlink="#FF0000">
In this example, "bgcolor" specifies the background color of the web page; in this
case, it is blue (more on colors later). "Text" specifies the color of normal text;
in this case, yellow. "Link" specifies the color of a web link; in this case, bright
yellow. "Vlink" specifies the color of a selected link; in this case, red.
Each color has a unique six digit identifier which is assigned according to industry
standards. Basic colors include:
|
|
| Black | rgb=#000000 |
| Blue | rgb=#0000FF |
| Blue, Dark | rgb=#0000AA |
| Bronze | rgb=#8C7853 |
| Brown | rgb=#BB0000 |
| Brown | rgb=#A62A2A |
| Brown, Dark | rgb=#5C4033 |
| Cyan | rgb=#00FFFF |
| Gold, Bright | rgb=#D9D919 |
| Green | rgb=#00FF00 |
| Grey | rgb=#C0C0C0 |
| Magenta | rgb=#FF00FF |
| Red | rgb=#FF0000 |
| Red, Bright | rgb=#EE0000 |
| Red, Dark | rgb=#AA0000 |
| White (as used here) | rgb=#FFFFFF |
| Yellow | rgb=#FFFF00 |
| Yellow, Bright | rgb=#EEE000 |
BACKGROUND
Before we leave the BODY tag completely, there is one variable worth mentioning,
the BACKGROUND tag which supersedes the BGCOLOR tag and permits the use of a graphic
(such as a JPG or GIF file) instead of a color backdrop. For example, the following BODY
tag with BACKGROUND JPG file (palmlog1.jpg) results in the background picture:
|
|
<body background="palmlog1.jpg" text="#000000" width=480 link="#00FFFF" vlink="#00FF00">
NOTE: As we will see later, the BACKGROUND variable can also be
used in TABLEs.
FONT
As we have seen, the BODY tag is used to establish the default standard
for text formatting. However, there will be instances where it is
to override font styles. To this end, there is the FONT tag which can be
used to adjust size, color, and style. To illustrate:
|
|
| <font size=+1>Text</font> | = | PLUS 1 EXAMPLE |
| <font size=+2>Text</font> | = | PLUS 2 EXAMPLE |
| <font size=-1>Text</font> | = | MINUS 1 EXAMPLE |
| <font size=-2>Text</font> | = | MINUS 2 EXAMPLE |
The FONT tag is also used to change text color (using the same color chart as
mentioned above); for example:
| <font color="#00FFFF">CYAN EXAMPLE</font> | = | CYAN EXAMPLE |
| <font color="#00FF00">GREEN EXAMPLE</font> | = | GREEN EXAMPLE |
| <font color="#FF00FF">MAGENTA EXAMPLE</font> | = | MAGENTA EXAMPLE |
| <font color="#FF0000">RED EXAMPLE</font> | = | RED EXAMPLE |
| <font color="#000000">WHITE EXAMPLE</font> | = | BLACK EXAMPLE |
| <font face="arial">ARIAL EXAMPLE</font> | = | ARIAL EXAMPLE |
| <font face="times">TIMES ROMAN EXAMPLE</font> | = | TIMES ROMAN EXAMPLE |
| <font face="courier">COURIER EXAMPLE</font> | = | COURIER EXAMPLE |
| <font face="helvetica">HELVETICA EXAMPLE</font> | = | HELVETICA EXAMPLE |
| <font face="garamond">GARAMOND EXAMPLE</font> | = | GARAMOND EXAMPLE |
| <font face="sans-serif">SANS SERIF EXAMPLE</font> | = | SANS SERIF EXAMPLE |
Can the FONT tag incorporate all of these variables? Yes. To illustrate:
| <font face="arial" size=+2 color="00FFF">CHANGE VARIABLES</font>
| =
| CHANGE VARIABLES |
<bgsound src="sound.mid" loop="infinite">
The LOOP statement will cause the MIDI file to play over and over continuously. If you
want the file to play only once, omit the LOOP statement.
|
|
INCLUDING IMAGES
In addition to text, graphics and photos are frequently used in a web page. JPEG (.JPG) and
GIF (.GIF) files are commonly used due to their efficiency in size. Bitmaps (.BMP) and TIFF
(.TIF) files are not used because they are large and cumbersome for traveling over the
Internet. A typical example of an IMAGE tag is:
<img src="palmlog1.jpg" align="middle" alt="Greetings from Palm Harbor">

- "img src=" - specifies the file to be used.
- "align=" - specifies the location of the file in the web page; e.g.,
"left", "right" or "middle". NOTE: "middle" is the default.
- "alt=" - provides the means to associate text with an image and is viewed
simply by placing the mouse on the image (optional feature).
Sometimes it becomes necessary to adjust the height and width of an image. Fortunately,
this is made easy by "height" and "width" parameters on the image tag. To illustrate,
let's use the same logo above but change its height and width:
<img src="palmlog1.jpg" height=95 width=102 align="middle" alt="Greetings from Palm Harbor">

You can either create your own animated GIF file using a GIF Construction Tool
which can be commonly found on the Internet or you can download ready-made GIF files
off of the Internet. GIF files are commonly used on the Internet but as a source
for free files, try:
3D Animated Flags - world and USA
Roger's Animated GIF Files
Free GIF's and Animation
Museum of Web Art - MOWA
Tim's set of Animated GIF files -
requires PKUNZIP to unload the file.
Tim's Masonic Logos - Masonic JPG and GIF files.
One last word of warning about animated GIF files: as attractive as these files
may be, try to use them sparingly. Animated GIF files tend to be larger in size
than plain GIF files and JPG files. Consequently, they take longer to load in
a web page.
|
|
| <p>
| Paragraph (no </p> tag is required).
Inserts a blank line between text.
<p align="justify"> sets the alignment;
("left" and "right" are also acceptable entries.)
|
| <br>
| Line BReak (no </br> tag is required)
Simpler than the paragraph tag; it forces the text
directly following the tag on to the next line at the
left margin without the addition of any white space.
|
<pre>
</pre>
| PREformatted text (very useful for presenting
text "as is") (such as this).
|
<xmp>
</xmp>
| Example; similar to the <pre> tag. Used to express
examples.
|
<b>
</b>
| Bold (text); sample: Your name
|
<i>
</i>
| Italic (text); sample: Your name
|
<b><i>
</i></b>
| Combining the Bold and Italic tags; sample: Your name
|
<u>
</u>
| Underline text
|
<em>
</em>
| Emphasize; sample: Another way to stress your point!!
|
| <li>
| List Item (no </li> tag required). Normally used in
relation to the Ordered List tag (<ol>) or the Unordered
List tag (<ul>), see below.
|
<ol>
</ol>
| Ordered List; sample Ordered List using the List Item tag (<li>):
<ol>
<li>First do this.
<li>Then do this.
<li>Then do that.
</ol>
RESULTS IN:
- First do this.
- Then do this.
- Then do that.
|
<ul>
</ul>
| Unordered List; sample Unordered List using the List Item tag (<li>):
<ul>
<li>First do this.
<li>Then do this.
<li>Then do that.
</ul>
RESULTS IN:
- First do this.
- Then do this.
- Then do that.
|
<center>
</center>
| CENTER (text or graphics); sample:
Your name
|
| <hr>
| Horizontal Rule (no </hr> tag required). For example, the line immediately
below this text was drawn with the <hr> tag.
|
<table>
</table>
| TABLE
|
| <th>
| Table Header (to label the columns)
|
| <td>
| Table Data (data to be placed inside a column/row coordinate.
|
| <tr>
| Table Row (the end of a row)
|
The following is a sample table with a CAPTION tag to identify the table (optional use).
<table border=1>
<caption>SAMPLE TABLE</caption>
<th>Col 1 <th>Col 2 <th>Col 3 <tr>
<td>C1,R1 <td>C2,R1 <td>C3,R1 <tr>
<td>C1,R2 <td>C2,R2 <td>C3,R2 <tr>
</table>
RESULTS IN:
SAMPLE TABLE
| Col 1 | Col 2 | Col 3 |
| C1,R1 | C2,R1 | C3,R1 |
| C1,R2 | C2,R2 | C3,R2
|
NOTE: The "border=1" tag defines the thickness of lines used to draw the columns and
rows in the table (optional). To illustrate the use of "border," here is the same table without
the "border" attribute:
<table>
<caption>SAMPLE TABLE</caption>
<th>Col 1 <th>Col 2 <th>Col 3 <tr>
<td>C1,R1 <td>C2,R1 <td>C3,R1 <tr>
<td>C1,R2 <td>C2,R2 <td>C3,R2 <tr>
</table>
RESULTS IN:
SAMPLE TABLE
| Col 1 | Col 2 | Col 3 |
| C1,R1 | C2,R1 | C3,R1 |
| C1,R2 | C2,R2 | C3,R2
|
A table behaves in many respects the same way as a full web page. As such, you may want
to think of it as a "mini-web page" in that you can control its characteristics in the
same manner as the BODY tag. For example, we can change the background color of the
table using the same attributes as found in the BODY tag:
<table bgcolor="FF0000" border=1>
<caption>SAMPLE TABLE</caption>
<th>Col 1 <th>Col 2 <th>Col 3 <tr>
<td>C1,R1 <td>C2,R1 <td>C3,R1 <tr>
<td>C1,R2 <td>C2,R2 <td>C3,R2 <tr>
</table>
RESULTS IN:
SAMPLE TABLE
| Col 1 | Col 2 | Col 3 |
| C1,R1 | C2,R1 | C3,R1 |
| C1,R2 | C2,R2 | C3,R2
|
Here is an example using a graphical BACKGROUND instead of a color:
<table background="madeos2.gif" border=1>
<caption>SAMPLE TABLE</caption>
<th>Col 1 <th>Col 2 <th>Col 3 <tr>
<td>C1,R1 <td>C2,R1 <td>C3,R1 <tr>
<td>C1,R2 <td>C2,R2 <td>C3,R2 <tr>
</table>
RESULTS IN:
SAMPLE TABLE
| Col 1 | Col 2 | Col 3 |
| C1,R1 | C2,R1 | C3,R1 |
| C1,R2 | C2,R2 | C3,R2 |
You can also add attributes to the Table Data tag <td> or Table Header <th>:
- background="madeos2.gif" (or whatever JPG or GIF file you wnat to use) - places
an image in the background of the cell.
- bgcolor="#000000" (or whatever color you want, see the colors
section above) - places a color in the background of the cell (more commonly used
than the "background" attribute.
- valign="top" (or "bottom") - aligns text or an image in a cell
- height="20%" (or whatever percentage you want) - specifies the height of the
cell in proportion to the table (although not frequently used).
- width="#20%" (or whatever percentage you want) - specifies the width of the
cell in proportion to the table.
Here is an example of a table using such attributes:
<table border=1>
<caption>SAMPLE TABLE</caption>
<th width="#5%">Col 1 <th width="#20%">Col 2 <th width="#20%">Col 3 <tr>
<td valign="bottom" bgcolor="#FF0000" width="#5%">C1,R1
<td valign="top" width="#20%">Here we can write a lot of text. And it always aligns to the top of the cell.
<td valign="top" width="#20%">Here we can write a lot of text. And it always aligns to the top of the cell.
<tr>
<td valign="bottom" bgcolor="#FF0000" width="#5%">C1,R2
<td valign="top" width="#20%">Here we can write a lot of text. And it always aligns to the top of the cell.
<td valign="top" width="#20%">Here we can write a lot of text. And it always aligns to the top of the cell.
<tr>
</table>
RESULTS IN:
SAMPLE TABLE
| Col 1 | Col 2 | Col 3 |
| C1,R1
| Here we can write a lot of text. And it always aligns to the top of the cell.
| Here we can write a lot of text. And it always aligns to the top of the cell.
|
| C1,R2
| Here we can write a lot of text. And it always aligns to the top of the cell.
| Here we can write a lot of text. And it always aligns to the top of the cell.
|
NOTE: In order for the columns to remain at a consistent "width" each
<td> or <th> tag must have the same "width" attribute. In the
example above we've used 5% for first column and 20% for the second and third columns.
By the way, did you notice that the text in the first column is in the
lower left-hand corner. That's because we used the valign="bottom" attribute.
ANCHORS (ESTABLISHING LINKS)
The ANCHOR tag is used in HTML to establish links to other Internet sites;
e.g., Web sites, FTP sites, Newsgroups, E-mail, etc. The anchor tag is simply expressed
as <a> </a> with its accompanying Hypertext REFerence (HREF)
attribute. Let's look at some examples:
A Web Link (HTTP; Hyper Text Teleprocessing Protocol)
<a href="http://www.phmainstreet.com/">Palm Harbor Main Street</a>
RESULTS IN:
Palm Harbor Main Street
An FTP Link (File Transfer Protocol)
<a href="ftp://hobbes.nmsu.edu/">Hobbes</a>
RESULTS IN:
Hobbes
A Newsgroup Link (NNTP; Network News Transport Protocol)
<a href="news:comp.os.os2.announce">OS/2 Announcements</a>
RESULTS IN:
OS/2 Announcements
E-Mail (POP; Post Office Protocol)
<a href="mailto:johndoe@aol.com">John Doe</a>
RESULTS IN:
John Doe
Even better, you can automatically fill in the "Subject" line of an
e-mail message using the following tag:
<a href="mailto:johndoe@aol.com?subject=Web Inquiry">John Doe</a>
RESULTS IN:
John Doe
With the Subject line as: "Web Inquiry" (try clicking on "John Doe" above).
As should be obvious, just about anything can be placed between the <a> </a>
tags, both text and graphics. To illustrate, here is how we use an IMAGE tag to
link to a web site:
<a href="http://www.phmainstreet.com/"><img src="palmlog1.jpg" align="middle"
alt="Click on image to go to Palm Harbor Main Street"></a>
RESULTS IN:
An anchor is not restricted in use to just Internet sites, it can be used to
associate images (to enlarge a "thumbnailed" photo) or to associate an audio file
or multimedia file with an object. Let's look at a couple of examples:
<a href="palmlogo.jpg"><img src="palmlog1.jpg" align=middle alt="Click on photo to enlarge. Click Back to return."></a>
RESULTS IN:
<a href="timbryce.wav">Click HERE for audio file.</a>
RESULTS IN:
Click HERE for audio file.
ACCESSING SUB-SECTIONS
The anchor tag is also a convenient means to jump around in a single document. The Table
of Contents section at the beginning of this document provides an excellent example. Because of
the length of this document, it was necessary to break it up into smaller sections. In order
to facilitate a quick reference for the reader, the Table of Contents was added to allow the
reader to jump to a particular section in the document instead of scrolling.
To illustrate, each section in the table of contents is labled such as:
<a href="htmldoc.htm#intro">INTRODUCTION</a>
And, as such appears as:
INTRODUCTION
Notice the use of the pound sign (#) to indicate an extension to the file "htmldoc.htm". The
"#intro" extension is used to point to a NAME tag in the document. For example, the "Introduction"
section of this document is coded as:
<a name="intro"><b>INTRODUCTION</b></a>
|
|
FORMS
A form is a technique for collecting data, e.g., to make an inquiry, order a product or
service, etc. The FORM tag <form> </form> can be placed anywhere in the body
of an HTML file and is expressed as:
<form method=post action="mailto:youremail@anywhere.com">
In this example, "method" and "action" instructs the computer to post (send) the data
to an e-mail address (a common use of the FORM technique). Another example is:
<form method=post action="http://www.phmain.com/test.cfm">
This example sends the data to a .CFM (ColdFusion) file for processing. It can also
be processed by other such technigues, such as CGI scripts.
Following the FORM tag <form>, the user can use different techniques for collecting
data:
|
|
| TYPE | TAG | HOW USED |
| Field Entry | <input name="field"> | To type data into a specific field.
|
| Check Boxes | <input type="checkbox" name="1" value="identifier"> | To select multiple choices.
|
| Radio Buttons | <input type="radio" name="1" value="identifier"> | To make one selection
from multiple options.
|
| Selection List | <select name="identifier"> | Similar to Radio Buttons; to make one selection
from multiple options. Handy for long list of options.
|
| Text Area | <textarea name="identifier" rows=10 cols=64> | Excellent for
expressing general comments.
|
| Push Button | <input type="submit" value="SEND"> | To request immediate action.
|
SAMPLE FORM
(using the techniques mentioned above; try it!)
Here is the code used to produce the preceding example:
<center><font face="arial" color="FF0000" size=+2><b><i>SAMPLE FORM</i></b></font>
<br><b>(using the techniques mentioned above; try it!)</b></center>
<p><ul>
<form method=post action="mailto:youremail@anywhere.com">

<b>Enter Your Name Here</b>
<br><input name="name" size="40">
<p>

<b>And where do you live?</b>
<br><input name="address" size="40">
<p>

<b>What do you want to purchase?</b>
<br><input type="checkbox" name="1" value="this"> I want this.
<br><input type="checkbox" name="2" value="that"> I want that.
<br><input type="checkbox" name="3" value="also"> I want this also.
<p>

<b>Are you sure you want these items?</b>
<br><input type="radio" name="1" value="Yes"> Yes
<br><input type="radio" name="1" value="No"> No
<br><input type="radio" name="1" value="Maybe"> Maybe
<p>

<b>Please verify this:</b>
<br><select name="select">
<option>Yes
<option>No
<option>Maybe
</select>
<p>

<b>Please enter your comments below:</b>
<br><textarea name="dscriptn" rows=10 cols=64></textarea>
<p></ul>

<center><b>Press <i>Send</i> to transmit, press <i>Clear</i> to blank the fields.</b>
<p>
<input type="submit" value="SEND"> <input type="reset" value="CLEAR"></center>

</form>
SPECIAL TAGS
During the course of writing a web page, there inevitably will be occasions when the
user will need to express special symbols. Here is a basic list of such symbols and
how to code them:
|
|
| & | = | & ampersand |
| ¢ | = | ¢ Cent symbol |
| ¥ | = | ¥ Japanese Yen sign |
| £ | = | £ English Pound (Sterling) |
| © | = | © Copyright notation |
| ™ | = | ™ Trademark (TM) |
| ® | = | ® Registered trademark |
| ® | = | ® Registered trademark |
| · | = | · Center Dot |
| ¼ | = | ¼ Fraction 1/4 |
| ½ | = | ½ Fraction 1/2 |
| ¾ | = | ¾ Fraction 3/4 |
| ¿ | = | ¿ Inverted question mark |
| < | = | < Less than symbol |
| > | = | > Greater than symbol |
| É | = | É (accented; Large E) |
| é | = | é (accented; small e) |
| Å | = | Å (A ring) |
| ø | = | ø (O slash) |
| ö | = | ö (O double-dot) |
| æ | = | æ (combines AE) |
| &252; | = | ü (European) |
| ° | = | ° Degree |
| &247; | = | ÷ Division sign |
| &126; | = | ~ Tilde |
| | = | Space Filler (blank) |
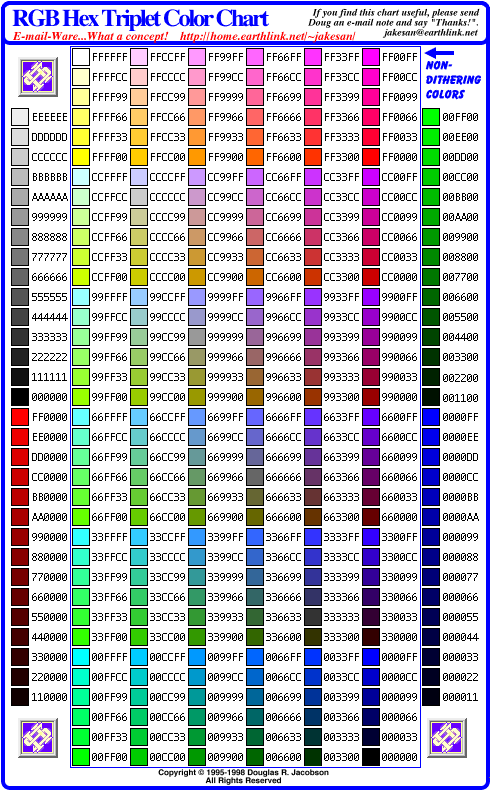
For a more complete list of codes, see
The HTML Document Character Set.
There are some other unusual tags available that are not commonly known but
are quite useful:
SHORTCUT ICON
For Netscape users, you can place a small graphic icon (.ICO file - 50 x 50) in the Web Address
input field by adding the following sample code:
<link rel="shortcut icon" href="graphic.ico" type="image/x-icon">
BLINK
The <blink> </blink> tag is used to cause text to blink,
a useful technique for gaining the attention of a reader. However, the BLINK tag
is used only by Netscape. If you have the Netscape browser, here is an example:
<blink>HEY, LOOK AT ME! </blink>
RESULTS IN:
Other browsers will see just plain text (not animated).
COMMENTS
To hide text in a web page from public viewing, use the following "comment"
tags:
<!-- -->
A couple of examples:
<!-- This file is the property of ABC Company  -->

<!-- NOTE TO SELF:

Hold the next three paragraphs until data is verified.   -->
MARQUEE
Primarily for use with the MS Internet Explorer and other advanced versions of
web browsers:
<marquee bgcolor=#bbffff direction=right behavior=scroll scrollamount=3 scrolldelay=30 width=90%>
A right scrolling Marquee set for smooth scrolling</marquee>
Results in:
INSERTING TEXT INTO A WEB PAGE
This is used to insert text from an external file (as found in "copyblac.htm") into
a web page:
<iframe id="datamain" src="copyblac.htm" width=30 height=13 marginwidth=0 marginheight=0 hspace=0 vspace=0 frameborder=1 scrolling=no></iframe>
Results in the following text being inserted here ->
META TAGS
Another technique for hiding text, yet conveying important information is the
META tag <meta> (there is no </meta> tag). This is primarily used
to simplify the process of registering a web page with search engines by embedding
special <meta> comments in an HTML file (in the HEAD section <head> </head>). META
tags are statements hidden from public view yet are automatically read by search engines to update
their data bases with certain entries describing a web page. For example:
<head>

<meta name="Title" content="Corporate Web Page http://www.corporate.com/">

<meta name="Author" content="John Smith jonh@aol.net">

<meta name="Subject" content="Coporate products and services">

<meta name="Description" content="Located in Tampa, Florida.">

<meta name="Keywords" content="CORPORATE FLORIDA TAMPA">

<meta name="Generator" content="MS Front Page">

<meta name="Language" content="English">

<meta name="Expires" content="Thu, 04 Oct 2010 14:21:20 GMT">

<meta name="Abstract" content="Describes our company's products and services.">

<meta name="Copyright" content="2002">

<meta name="Designer" content="Charlie Hustle charlie@aol.net">

<meta name="Publisher" content="ABC Company">

<meta name="Revisit-After" content="3 Days">

<meta name="Distribution" content="Global">

<meta name="Robots" content="All">
Notice the company name and web address included in the first statement; keywords
in the fifth line. All of these entries are used by search engines (although some
are highly optional). To illustrate, keywords are words or phrases used by Web
surfers to look-up a site in a search engine. For example, the search request may
be: "CORPORATE, TAMPA, FLORIDA". From this, a web address would be displayed. Although
you can give a search engine as many keywords as desired, typically 10 are used. Keywords
should include: your business name, geographical location (city, state), products or
services, trademarks, synonyms, and common misspellings.
TRICK: Copy the "Keywords" meta tags five (5) times in your HTML. This will
aid search engines in finding your web page (and push it up in the "hit" ratings,
thereby displaying it as one of the first listings).
Click HERE for a handy Meta Tag Generator.
USING THE UL TAG FOR INDENTING
A clever way to setup a basic indentation of text in a web page is the UNORDERED LIST <ul>
</ul> tag as mentioned earlier. By simply putting the <ul> statement at the beginning
of a section of text, the text is thereby indented evenly; to illustrate:
The quick brown fox jumped over the lazy dog. The quick brown fox jumped over the
lazy dog. The quick brown fox jumped over the lazy dog. The quick brown fox jumped over the lazy dog.
The quick brown fox jumped over the lazy dog. The quick brown fox jumped over the
lazy dog. The quick brown fox jumped over the lazy dog. The quick brown fox jumped over the lazy dog.
The quick brown fox jumped over the lazy dog. The quick brown fox jumped over the
lazy dog. The quick brown fox jumped over the lazy dog. The quick brown fox jumped over the lazy dog.
Here is the code used to create the preceding example:
<ul>
The quick brown fox jumped over the lazy dog.  The quick brown fox jumped over the
lazy dog.  The quick brown fox jumped over the lazy dog. The quick brown fox jumped over the lazy dog.
<p>
<ul>
The quick brown fox jumped over the lazy dog.  The quick brown fox jumped over the
lazy dog.  The quick brown fox jumped over the lazy dog. The quick brown fox jumped over the lazy dog.
<p>
<ul>
The quick brown fox jumped over the lazy dog.  The quick brown fox jumped over the
lazy dog.  The quick brown fox jumped over the lazy dog. The quick brown fox jumped over the lazy dog.
</ul>
</ul>
</ul>
Notice how the text is indented with the introduction of each <ul> comment. Also,
observe how a </ul> tag must be used to close each level; three levels, three sets of
</ul>.
USING THE TARGET= TAG
As we have discussed, the anchor tag is used to link to other web pages. However, there
may be occasions where it is necessary to spawn a second web browser window; e.g., so
readers do not lose their place in your web page. To do this, use the TARGET= attribute in
the ANCHOR tag and have it point at your main web page. For example, INDEX.HTM is the
principal file used here; as such, it becomes the target:
<a href="http://www.phmainstreet.com/mba/" target="index">MBA's HOME PAGE</a>
TRY IT: MBA's HOME PAGE
|
|
JAVASCRIPT
JavaScript is a special script language you can embed within an HTML file to perform specific
tasks. Free JavaScript code is made available at
JavaScript Source. One important note when using JavaScript, remember to include
the following tags in your JavaScript:
<!-- hide from older browsers
<!-- ending hiding -->
These tags are for the benefit of older browsers that
do not support JavaScript.
Two well-used examples of JavaScript is to show the time and a marquee to display special
messages.
SHOW TIME
The following JavaScript code is used to indicate the last time a web page (HTML file) was
updated:
<script language="JavaScript">
<!-- hide from older browsers
document.write ("<center><small><b>Web page updated: " +
       document.lastModified + "</b></small></center>")
<!-- ending hiding -->
</script>
RESULTS IN:
|
|
MARQUEE
The Marquee scrolls a text message at the very bottom of the web browser, a very effective
means for catching the eye of the reader. First, an "onload" tag must be added to the BODY
tag, such as:
                                                                                vvvvvvvvvvvvvvvvvvvvvvvvvvvvvvvvvvvvvvvvvvvvvvvvvvvvvvvvvvvvvvvvvvvvvvvvvvvvvvv
<body bgcolor="#AA0000" text="#EEE000" width=480 LINK="#FFFFFF" VLINK="#FFFFFF" onload="window.config.timer=window.setTimeout('sbprint()',window.config.delay)">
This is followed by the JavaScript code:
<body bgcolor="#AA0000" text="#EEE000" width=480 LINK="#FFFFFF" VLINK="#FFFFFF" onload="window.config.timer=window.setTimeout('sbprint()',window.config.delay)">
<script language="JavaScript">
<!-- hide from older browsers
/* Loop through an indexed array of n elements with length property */
function mklist(n)
{
        this.length=n;
        for (var c=1 ; c <= n ; c++) {
                this[c]=0;
        }
        return this;
}

/* Set a browser platform specific delay calibration for scrolling messages */
function browserdelay()
{
        var retval=100;
        if (navigator.userAgent.indexOf("Win") != 0) {          /* Windows based Netscape */
                retval=150;
        }
        else if (navigator.userAgent.indexOf("Mac") != 0) {     /* Mac based Netscape */
                retval=500;
        }
        else if (navigator.userAgent.indexOf("X11") != 0) {     /* XWindows based Netscape */
                retval=750;
        }
        return retval;
}

/* Create the configuration object for scrollit */
function mkcfg(n)
{
        this.num=1;                             /* Which message we're on */
        this.seed=0;                            /* Used for scrolling types */
        this.list=new mklist(n);                /* List of messages to display */
        this.type=new mklist(n);                /* Display method indicators */
        this.delay=browserdelay();              /* Browser platform specific delay */
        this.timer=0;                           /* System event timer */
        this.showurl=(3 * 1000);                /* Timeout for urlfix functionality */
        this.looping=true;                      /* Continuously rotate messages? */
        this.msgdisp=(5 * 1000);                /* How long to display non-scrolling messages */
        this.barwidth=25;                       /* How many character to size the status bar */
        return this;
}


/* This function is used from within the page to display the url for a link */
function urlfix(obj)
{
        window.clearTimeout(window.config.timer);
        window.defaultStatus=obj.href;
        window.config.timer=window.setTimeout("sbprint()",window.config.showurl);
        return true;
}

/* This function handles the right to left scrolling */
function scrollit_r2l()
{
        var out=" ";
        var c=0;

        if (window.config.seed <= window.config.barwidth && window.config.seed > 0) {
                for (c=0 ; c < window.config.seed ; c++) {
                        out+=" ";
                }
                out+=window.config.list[window.config.num];
                window.config.seed--;
                window.status=out;
                window.config.timer=window.setTimeout("scrollit_r2l()",window.config.delay);
        }
        else if (window.config.seed <= 0) {
                if (-window.config.seed < window.config.list[window.config.num].length) {
                        out+=window.config.list[window.config.num].substring(-window.config.seed,window.config.list[window.config.num].length);
                        window.config.seed--;
                        window.status=out;
                        window.config.timer=window.setTimeout("scrollit_r2l()",window.config.delay);
                }
                else {
                        window.status=" ";
                        window.config.num++;
                        window.config.timer=window.setTimeout("sbprint()",window.config.msgdisp);
                }
        }
}


/* Call the following with the number of different messages you want to run */
window.config=new mkcfg(5);
window.config.list[1]="Welcome to Bryce on HTML.";                                         <--FIRST MESSAGE
window.config.type[1]=1;        /* Scroll right to left */

window.config.list[2]="This is where you will learn to write HTML for dynamic web pages."; <--2ND MESSAGE
window.config.type[2]=1;        /* Scroll right to left */

window.config.list[3]="I'll also show you some special tricks for use on your web page";   <--3RD MESSAGE
window.config.type[3]=1;        /* Scroll right to left */

window.config.list[4]="Such as this scrolling marquee.";                                   <--4TH MESSAGE
window.config.type[4]=1;        /* Scroll right to left */

window.config.list[5]="Hope you enjoy it.";                                                <--5TH MESSAGE
window.config.type[5]=1;        /* Scroll right to left */


/* This function runs the status bar, cycling through your messages */
function sbprint()
{
        if (window.config.num <= window.config.list.length) {
                if (window.config.type[window.config.num] == 0) {
                        window.status=window.config.list[window.config.num];
                        window.config.num++;
                        window.clearTimeout(window.config.timer);
                        window.config.timer=window.setTimeout('sbprint()',window.config.msgdisp);
                }
                else if (window.config.type[window.config.num] == 1) {
                        window.config.seed=window.config.barwidth;
                        scrollit_r2l();
                }
        }
        else if (window.config.looping) {
                window.config.num=1;
                window.clearTimeout(window.config.timer);
                window.config.timer=window.setTimeout('sbprint()',window.config.delay);
        }
}

<!-- ending hiding -->
</script>
PASSWORD PRO: GET A PASSWORD
Configure your access code.
|
FRAMES
In the early days of web browsers, the software could only display one web page at a time. Today,
most browsers use "frames" to display multiple pages at one time. The frames technique provides a
convenient means to navigate a web site and is becoming the principal means for displaying web
pages. The only caveat here is that there are still some old browsers that do not support the
teachnique. If this does not bother you, then, by all means use the frames technique.
Frames allows you to partition the viewing area of the web browser. To do so, your main HTML
file (e.g., INDEX.HTM) must define the frames; for example:
<html>
<head><title>Sample Frames Based Web Page (3 part)</title>
</head>
<frameset border="0" rows="90,*">
<frame name="top" src="top.htm" scrolling="no" marginwidth="0" marginheight="0" noresize>
  <frameset cols="128,*">
    <frame name="leftframe" src="toc.htm" scrolling="auto" marginheight="0" noresize>
    <frame name="mainfram" src="cover.htm" scrolling="auto" marginheight="0" noresize>
  </frameset>
</frameset>
<body>
</body>
</html>
This example produces a web page with three parts: a "top" frame extending over the top and
features the contents of the TOP.HTM file; a "leftframe" to the bottom left featuring the contents
of TOC.HTM (Table of Contents), and; the "mainfram" used as the main viewing area showing COVER.HTM.
To place different content in the "mainfram" area, a "traget=" attribute must be added. For example,
in the TOC.HTM file, you may find:
<a href="cover.htm" target="mainfram">Cover</a>

<a href="tour.htm" target="mainfram">Tour</a>

<a href="divert.htm" target="mainfram">Diversions</a>
Here is an example of a two frames web page (vertical split):
<html>
<head><title>Sample Frames Based Web Page (2 part)</title>
</head>
<frameset border="1" cols="128,*">
  <frame name="leftframe" src="toc.htm" scrolling="auto" marginheight="0" resize>
  <frame name="mainfram" src="cover.htm" scrolling="auto" marginheight="0" resize>
</frameset>
<body>
</body>
</html>
FOR ADDITIONAL INFORMATION
Web page produced by M. BRYCE & ASSOCIATES (MBA)
of Palm Harbor.
Copyright © 1999-
by M&JB. All rights reserved.
